Plastic parts inspection is an important aspect of the manufacturing process. It involves assessing the quality and conformity of plastic parts to ensure they meet specified standards. Plastic parts Inspection methods may include visual checks, dimensional measurements, various testing techniques, etc. In this article, we will provide an in-depth analysis of plastic parts inspection.
Why Plastic Parts Inspection Matters?
Plastic parts inspection is not just a routine step in manufacturing; it’s the linchpin for quality assurance. Here’s why it holds paramount importance:
Ensuring Superior Quality
Plastic parts inspection is an effective way to ensure each component meets the highest standards.
Adherence to Industry Standards
Beyond our internal standards, plastic parts inspection guarantees our custom products meet industry-wide expectations.
Building Customer Confidence
Customers deserve products they can trust. Plastic parts inspection provides the assurance that what they receive is not only of high quality but also precisely what they expect.
Cost-Effective Prevention
Finding issues early in the production process is a cost-effective way. Plastic parts inspection acts as a preventive measure, finding potential problems and ensuring a cost-effective manufacturing process.
Common Plastic Part Defects
During plastic manufacturing, various defects can occur, impacting both the aesthetic appeal and structural integrity of the final product. Let’s delve into a more detailed exploration of these common plastic part defects:
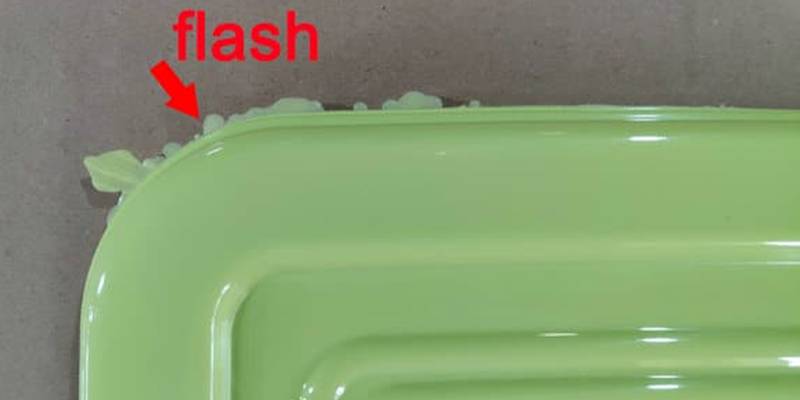
Flashing:

Flashing occurs when excess molten plastic escapes between the mold halves, creating unwanted projections at the parting line.
Learn How to Dealing with Injection Molding Flash: Causes, Prevention, and Removal
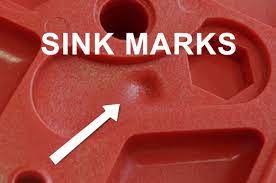
Sink Marks:

Sink marks are depressions or dents on the part surface during cooling and solidification caused by uneven cooling rates, and material shrinkage.
Read our previous blog: Dealing with Injection Molding Sink Marks: Causes and Prevention
Warpage:

Warpage is undesirable changes in the shape or dimensions of the plastic part post-production. Usually caused by the non-uniform cooling rate.
Learn more details about warpage and how to solve it: Deal with Warpage in Injection Molding: Causes and Prevention
Weld Lines:

When the material flow is inadequate, the weld lines will occur where molten plastic from different flow fronts converges and solidifies, often resulting in visible lines.
What causes weld lines and how to avoid it? Read our previous blog for answers: Understanding Injection Molding Weld Lines: Causes, Effects, and Solutions
Air Bubble:

Air bubbles or voids are empty spaces or air pockets within the plastic material, often caused by insufficient pressure during molding or entrapped air.
To find out more, read our blog: Minimizing Injection Molding Air Bubbles: Strategies for High-Quality Products
Brittleness:
Brittleness refers to excessive stiffness in the plastic, leading to increased fragility and susceptibility to breakage under stress.
Burn Marks:
Description: Burn marks manifest as darkened areas on the surface due to localized overheating during the molding process.
To understand better about injection molding defects, read our blog: 7 Plastic Injection Molding Defects: Their Causes and Solutions
Types of Plastic Parts Inspection
Plastic parts inspection is a meticulous process that covers various dimensions to guarantee the high quality. Let’s explore the key types of inspections:
Visual Inspection
Visual checks are the first step to finding surface imperfections. Visual inspections involve checking the surface of plastic parts for any imperfections such as scratches, scuffs, or discolorations. Identifying imperfections in the early stages allows for timely intervention, preventing the more serious issues and reducing the need for extensive rework.
Dimensional Inspection
Dimensional inspection ensures that each part aligns precisely with specified dimensions. Dimensional inspection involves measuring critical aspects such as length, width, and height to ensure they meet design specifications. Accurate dimensions are important for proper fit, assembly, and overall functionality.
Tools like calipers, gauges, and coordinate measuring machines (CMM) ensure precise measurement. Techniques such as 3D scanning provide detailed insights into the overall dimensional conformity of plastic parts.
Functional Testing
Functional testing assesses whether plastic parts meet the performance requirements for their applications.
Examples include stress testing for load-bearing components, fluid flow testing for plumbing parts, and electrical conductivity testing for components in electronic applications.
Material Testing
Material testing involves confirming that the plastic used possesses the desired properties such as strength, flexibility, and durability. Matching material properties with application requirements is important for long-term reliability.
Material testing techniques include tensile testing, impact testing, and thermal analysis to evaluate material behavior under different conditions.
Plastic Parts Inspection Tools and Technology
Advanced tools and technologies will improve the effect of plastic parts inspection.
Coordinate Measuring Machines (CMM)
CMM is an automated system for precise dimensional measurement. It provides detailed three-dimensional coordinates, ensuring accuracy in complex geometries.
Visual Inspection Tools
Tools like magnifiers and microscopes for detailed visual scrutiny. They are identifying surface defects with high magnification, ensuring meticulous inspection.
Automated Inspection Systems
Automated systems use sensors and cameras to inspect plastic parts rapidly. They are swift identification of defects, ensuring efficiency and consistency in inspection processes.
3D Scanning and Imaging
Using laser or structured light to create a detailed 3D model of the part’s surface. This technology offers a comprehensive analysis of part geometry, facilitating accurate dimensional inspection.
Ultrasonic Inspection
Ultrasonic waves are used to identify internal defects or inconsistencies in plastic parts. The ultrasonic inspects detects voids, inclusions, or delaminations within the material, ensuring structural integrity.
Radiographic Inspection
Involves X-rays or gamma rays to penetrate the material and reveal internal structures. The rays provide insights into internal features, ensuring quality without altering the part.
Acoustic Inspection
Analyzes the sound produced by a part when subjected to stress or vibration. That technology will identify internal defects or inconsistencies by analyzing the acoustic response, ensuring reliability.
Common Challenges in Plastic Parts Inspection
Plastic parts inspection is full of challenges in some conditions. Let’s explore these challenges and find the solutions to ensure precision.
Surface Variation
Challenge: Inconsistent surface textures can increase difficulties in detecting minor defects.
Discussion: Make the surface of the plastic parts as consistent and uniform as possible.
Complex Geometries
Challenge: Parts with intricate shapes may complicate dimensional inspection.
Discussion: Employing advanced tools like 3D scanners helps capture complex geometries with precision.
Internal Defects
Challenge: Identifying defects within the material without altering the part’s integrity.
Discussion: Techniques like ultrasonic inspection and radiographic methods provide insights into internal structures without compromising the part.
Conclusion
During the process of manufacturing, plastic parts inspection is an important element, guaranteeing the consistency and quality of each custom component. From visual checks to precise dimensional checks, every aspect of the inspection process contributes to excellence.
For manufacturers, this investment not only ensures product reliability but also gets customer trust. The precision achieved in inspection is not merely a necessity; it is the foundation for instilling confidence and building enduring relationships.


