CNC machining tolerances are an important parameter when manufacturing products, and most industrial and consumer products require consistency to meet manufacturing standards. Selecting the right tolerance is critical for any custom machined part because it affects the function, manufacturability, delivery time, and cost of the component.
Therefore, machining service manufacturer rely on various types of CNC machines to achieve high precision in their manufacturing projects.This guide dives deep into the world of CNC tolerances, exploring their definitions, types, influencing factors, selection criteria, and surface roughness considerations.
What Are CNC Machining Tolerances?
Machining tolerances refer to the permissible range of deviation in a part’s dimensions or geometry from its nominal design specifications. In tolerance machining, these limits ensure that a manufactured part remains functional and compatible with other components in an assembly, even if it deviates slightly from the ideal measurements.
For instance, consider a steel rod designed with a diameter of 50 mm and a general machining tolerance of ±0.1 mm. The rod’s actual diameter can range from 49.9 mm to 50.1 mm and still be acceptable. This flexibility is crucial because achieving absolute precision is impractical and costly due to variables like material properties and machine limitations.
How Tolerances Are Expressed?
Machining tolerances are in various formats to suit different manufacturing needs:
1. Upper and Lower Limits: This specifies the exact range of acceptable dimensions, such as 49.9 mm to 50.1 mm for a 50 mm nominal dimension.
2. Plus/Minus Notation: Commonly used in general machining tolerances, this format indicates the allowable deviation, e.g., 50 mm ±0.1 mm.
3. Unilateral Tolerances: These allow variation in only one direction, such as 50 mm +0.1 mm/-0 mm, often used in CNC milling tolerances for parts requiring a precise fit.
4. Geometric Dimensioning and Tolerancing (GD&T): This advanced system, governed by standards like ASME Y14.5, defines not just dimensional tolerances but also geometric characteristics like flatness or concentricity, critical for high tolerance precision machining.
Types of Machining Tolerances
The realm of machining tolerances encompasses a variety of types, each tailored to specific manufacturing needs and applications. Below, we explore four key types of tolerances.
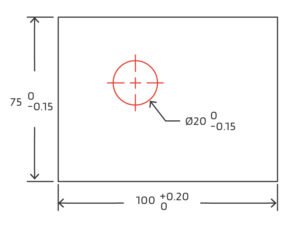
Unilateral Tolerance
Unilateral tolerance is particularly used in applications requiring precise fits, such as in CNC milling tolerances or turning tolerances. This type of tolerance allows deviation in only one direction from the nominal dimension, ensuring a controlled fit between mating parts.
For example, a shaft designed with a nominal diameter of 25 mm and a unilateral tolerance of +0.05 mm/-0 mm must measure between 25 mm and 25.05 mm.
In tolerance machining, unilateral tolerances are often specified for parts that must integrate seamlessly into assemblies. By restricting variation to one direction, unilateral tolerances support tight tolerance machining while maintaining cost efficiency.
Bilateral Tolerances
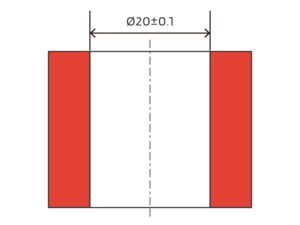
Bilateral tolerances offer flexibility by permitting deviations in both positive and negative directions from the nominal dimension, making them a staple in general machining tolerances, typically ranging from ±0.127 mm to ±0.762 mm.
For example, a part with a nominal length of 100 mm and a bilateral tolerance of ±0.15 mm can measure between 99.85 mm and 100.15 mm.
This type of tolerance is widely used in CNC milling tolerances and turning tolerances, particularly for components like structural brackets or panels that don’t require ultra-precise fits.
Limit Tolerance
Limit tolerance defines the acceptable range of a dimension by specifying explicit upper and lower boundaries, providing a clear framework for machining tolerances.
For instance, a part with a nominal diameter of 50 mm might have a limit tolerance of 49.9 mm to 50.1 mm. Limit tolerances is particularly useful in CNC tolerances for parts requiring strict dimensional control, such as in high tolerance machining for aerospace components or medical devices.

Standard Machining Tolerances
Standard machining tolerances serve as the default when no specific tolerance is provided by the designer. Governed by standards such as ISO 2768, these tolerances apply to common features like linear dimensions, angles, or radii in parts including pipes, threads, and simple brackets. For example, ISO 2768’s medium tolerance class permits a deviation of ±0.2 mm on a 100 mm dimension.
Here is the standard machining tolerances for different manufacturing process.
| Processes | Standard CNC Tolerance |
|---|---|
| CNC lathe cutting | ±0.005" |
| 3-Axis CNC milling | ±0.005" |
| 5-Axis CNC milling | ±0.005" |
| CNC routing | ±0.005" |
| 3D printing | ±0.004" |
| Engraving | ±0.005" |
| Gasket cutting | ±0.030" |
Factors to Consider When Setting Machining Tolerances
Engineers and designers determine machining tolerances early in a project. They must consider factors such as:
Part Function and Fit
The primary consider of tolerance in machine design is the part’s role in an assembly. Mating parts, like a gear and shaft, demand tight tolerance machining (e.g., ±0.002”) to ensure proper fit and function. Non-mating features, such as cosmetic surfaces, can use general machining tolerances (e.g., ±0.010”) to reduce costs.
Material Properties
Materials is a important consideration in CNC machining tolerances. Soft materials like plastics (e.g., ABS or Nylon) may deform during machining, making tight tolerance machining challenging. In contrast, metals like aluminum or stainless steel offer better dimensional stability, supporting high tolerance machining.
Machining Process
The choice of CNC process—milling, turning, drilling, or grinding—affects achievable tolerances. CNC milling tolerances typically range from ±0.005” to ±0.010”, while turning tolerances can be tighter, around ±0.002”.
Cost Implications
Tighter machining tolerances increase production costs. Achieving high tolerance precision machining may require slower machining speeds or secondary finishing processes, driving up expenses.
Industry Standards
Machining tolerance standards like ISO 2768 or ASME Y14.5 provide a framework for consistent tolerance specification. Adhering to these standards ensures that standard tolerance for machined parts meets industry expectations.
Surface Finish and Post-Processing
Post-processing steps, such as plating or anodizing, can alter dimensions, impacting CNC tolerances. For example, plating adds a thin layer of material, which must be factored into standard tolerance for machined parts. Similarly, surface finish requirements can affect tolerances, as smoother finishes often require tighter control.
How to Choose Appropriate Machining Tolerances?
Choosing the right tolerances for manufacturing parts is a critical step that balances functionality, fit, cost, and manufacturability. Specifying overly tight tolerances unnecessarily increases manufacturing complexity and cost, while too loose tolerances can cause functional issues or assembly problems. Therefore, the goal is to choose the loosest tolerance that still meets the functional requirements of the part.
International Standards as a Foundation
The two primary ISO standards relevant here are:
- ISO 2768, which provides general tolerances for linear and angular dimensions when no specific tolerances are indicated. It is suitable for many features such as external and internal sizes, diameters, distances, chamfers, and radii.
- ISO 2768 has different tolerance classes, commonly Fine and Medium, allowing selection based on required precision. • ISO 286, which is focused on tolerances for cylindrical features like shafts and holes, where precise fits are essential. It defines multiple grades (e.g., Grade 6, 7, 8) representing different levels of precision, with Grade 6 being the tightest.
By default, ISO 2768 tolerances apply unless a tighter or more specific tolerance is required, in which case ISO 286 or other standards are explicitly specified.
Matching Tolerance to Application
The choice of tolerance depends heavily on the part’s function and manufacturing context:
- For high-precision parts used in aerospace, automotive, or medical devices, tighter tolerances such as ISO 2768 Fine combined with ISO 286 Grade 6 (IT6) are recommended to minimize variation and ensure precise fits.
- For interchangeable mechanical parts like gears, bearings, or fasteners, tolerances such as ISO 2768 Fine and ISO 286 Grade 7 (IT7) can take a good balance between precision and manufacturability.
- For general mechanical assemblies or larger fabricated structures where ultra-high precision is not necessary, ISO 2768 Medium tolerances suffice, reducing manufacturing cost without compromising function.
- For plastic components or consumer products where some dimensional variability is acceptable, looser tolerances like ISO 2768 Medium and ISO 286 Grade 8 (IT8) are appropriate, accommodating material flexibility and reducing cost.
Geometric Dimensioning and Tolerancing (GD&T)
Beyond linear and angular tolerances, GD&T provides a sophisticated system to control the geometry of features, such as flatness, perpendicularity, position, and runout.
Practical Guidelines
- Start with general tolerances (ISO 2768) for most features to simplify design and manufacturing.
- Specify tighter tolerances (ISO 286) only for critical features requiring precise fits, such as shafts and holes.
- Always balance precision with cost by choosing the loosest tolerance that still meets functional requirements.
- Clearly document any specific tolerance requirements on engineering drawings to avoid manufacturing errors.
Conclusion
Machining tolerances are the important factor in prototyping CNC and CNC manufacturing process. The degree of machining tolerances is different based on the projects. Cooperate with professional manufacturer can choose an right machining tolerances for your project. Zhongde has one-stop CNC machining shop, and offers comprehensive precision machining services. Contact us today to start your projects.
