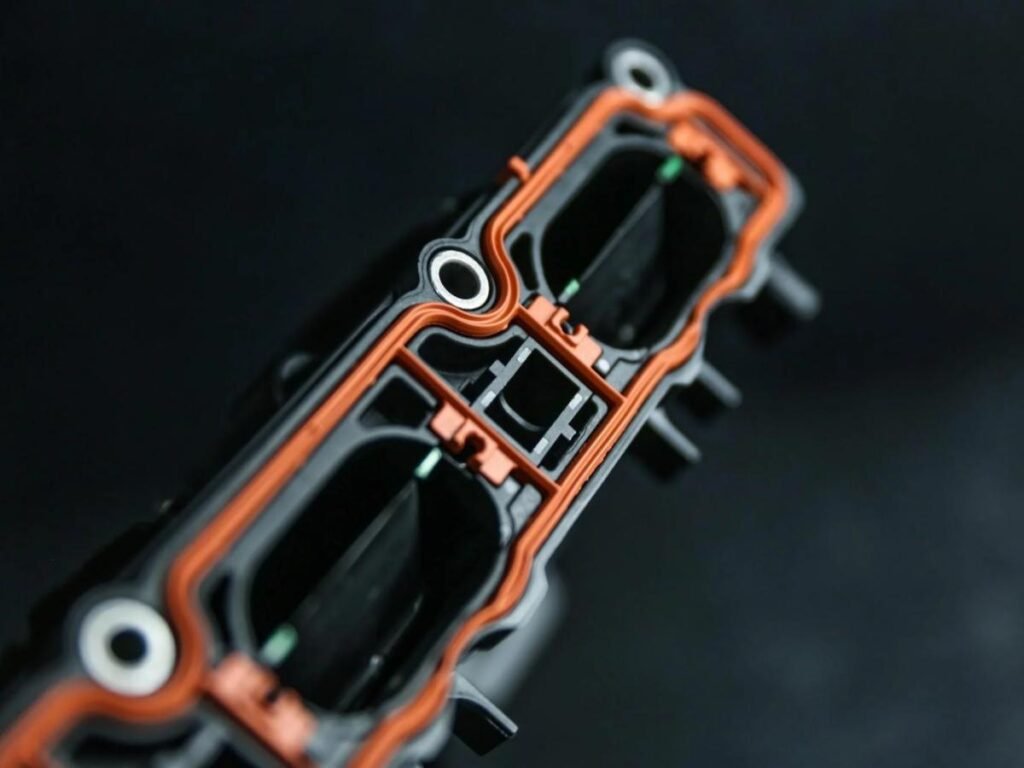
Molded parts designing is complex and involves a multitude of factors such as functional requirements, material selection, and structural considerations. Various elements, including wall thickness, draft, ribs, holes, and bosses, must be carefully considered to create effective molded part designs. This blog explores fundamental guidelines for molded parts plastic boss design. Following these guidelines can improve moldability, enhance mold life, increase part durability, and reduce manufacturing costs.
What is Boss in Plastic Design for Molded Parts?
In essence, a boss is a structural feature, a cylindrical projection with holes within molded parts.Common plastic injection molding boss types include solid, hollow, threaded, ribbed, blind, and through-hole bosses, each designed to meet specific strength, assembly, and manufacturing requirements.
They serve various functions, including but not limited to providing attachment points for screws, fasteners, or other assembly hardware. These features enable seamless assembly processes and ensure the structural integrity of the final product.

What is a Good Plastic Boss Design?
A good injection molding boss design is not just about creating a place for a screw or insert—it’s about ensuring strength, alignment, and manufacturability.
- Structural Support: A recessed or well-supported boss distributes stress more evenly and prevents cracking or deformation during assembly.
- Precise Alignment: Bosses can guide mating parts into position, ensuring accurate fit and reducing misalignment.
- Clean Aesthetics: Recessed bosses allow screws or fasteners to sit below the surface, resulting in a smoother, more finished appearance.
- Moldability: Good boss design considers draft angles, wall thickness, and core placement to ensure easy mold release and avoid defects like sink marks or warping.
Plastic Boss Design Guidelines for Molded Parts
The following is some boss design tips for molded plastic parts:
Base Radius for Bosses
To reduce stress, it’s essential to include a minimum radius at the base of a boss. The point where the boss meets the nominal wall is typically stressed, and stress will rise without a radius. However, the radius at the base of the boss should not exceed a maximum value to avoid thick sections. The recommended range for this base radius falls between 0.25 to 0.5 times the nominal wall thickness.
Spacing Between Bosses
Placing bosses too close to each other will create thin areas that are challenging to cool and can impact quality and productivity. Thin mold walls are hard to manufacture and can lead to issues like hot spots and uneven cooling, and results in reduced mold life. Therefore, it’s advisable to maintain a spacing between bosses of at least 2 times the nominal wall thickness.

Hole Base Radius for Bosses
Adding a radius to the core pin avoids sharp corners, making molding easier and reducing stress concentration. It’s suggested to have the radius at the hole’s base in the boss be 0.25 to 0.5 times the wall thickness.
Minimum Draft for Boss Outer Diameter
To ensure an easy demould, a suitable draft on the outer diameter (OD) of a boss is required. This draft is typically greater than or equal to 0.5 degrees.
Minimum Draft for Boss Inner Diameter
The designs need a minimum taper on the inner diameter(ID) of a boss for proper engagement with a fastener. The draft is on the boss’s inner walls, with a recommended minimum value of greater than or equal to 0.25 degrees. Not only does it allow for easy demould, but it also guarantees a proper and secure fit for fasteners.
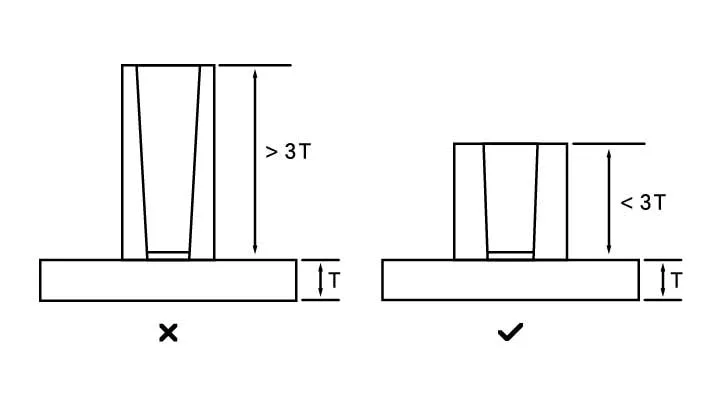
Optimal Boss Height to Outer Diameter Ratio
The advised boss height is less than three times the outer diameter (OD). Because too high a boss can result in undesired material mass and thick sections at the base. This is not easy to cool, and also extends the cycle time, and impacts the dimensional accuracy of cored holes.
Optimal Tip Radius for Bosses
To ensure their durability and longevity, it’s important to design a fillet with a specific minimum radius value at the tip of a boss. This radius will help to reduce stress.
Chamfer at the Top of Boss
For the top of a boss, it’s recommended to add a 30°–45° chamfer or a small radius to help guide screw insertion and reduce the risk of stress cracking.
Wall Thickness of Boss
The ideal boss wall thickness in injection molding should be about 60 percent of the nominal wall thickness to prevent sinking issues. Exceeding this thickness can lead to voids, sink marks, and longer cycle times. However, if the boss is in a non-visible area, you can increase the wall thickness to increase higher stresses from self-tapping screws.
Learn more about choosing the right injection molding wall thickness for your part design.
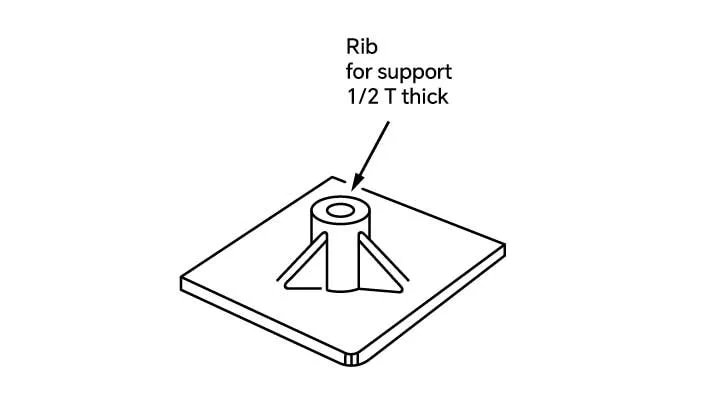
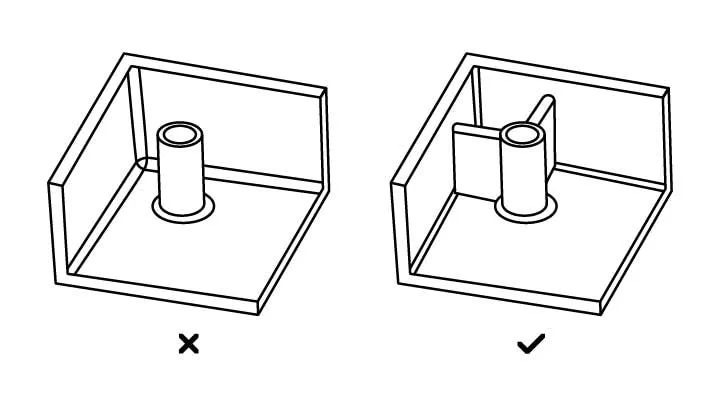
Standalone Boss
When dealing with bosses and other thick sections, coring is a recommended approach. Attaching the boss to the sidewall ensures even material flow and additional load distribution for the part. For improved rigidity and material flow, it’s best to connect a boss to the nearest side wall.
Common Issues and Solutions in Boss Design
Excessive Wall Thickness Causing Sink Marks
Bosses that are too thick compared to surrounding walls can lead to uneven cooling and sink marks. To prevent this, keep the boss wall thickness around 50-70% of the adjacent walls and consider adding ribs or hollow sections to maintain strength without excessive material.
Weak Structural Support Leading to Cracking or Warping
Tall or thin bosses without adequate reinforcement are prone to deformation or breakage during molding or use. Adding properly designed ribs and limiting the height-to-diameter ratio to about 3:1 improves structural integrity.
Insufficient Draft Angle Causing Ejection Difficulties
Boss sidewalls without a draft angle can cause the part to stick in the mold, increasing cycle time or damaging the part. Applying a draft angle of 1° to 2° ensures smooth mold release.
Sharp Corners Causing Stress Concentration
Sharp transitions between the boss and base can create stress points, leading to cracking. Incorporate fillets with a radius of 0.5–1 mm to distribute stress evenly.
Improper Top Chamfer Affecting Assembly
A boss top without a chamfer can make screw insertion difficult and cause stress concentrations. A chamfer of 30°–45° or a small radius improves assembly and reduces risk of damage.
Long Cooling Time Due to Boss Geometry
Large or thick bosses slow cooling, increasing cycle time. Optimize boss size and add cooling channels in the mold to improve cooling efficiency.
Material Properties Impacting Boss Performance
Material choice affects boss strength, shrinkage, and cooling behavior. High-shrinkage materials require tighter control of wall thickness, while low thermal conductivity materials may need enhanced cooling designs.
Conclusion with Plastic Boss Design Guideline
Understanding boss design details, including wall thickness, reinforcement, and mounting requirements, can help you create more reliable injection molded parts and avoid common defects during production. By following proper design guidelines, you can improve part quality while reducing unnecessary tooling and manufacturing issues.
If you need help developing high-quality plastic parts, Zhongde provides professional custom injection molding service to support your project from design review to final production.