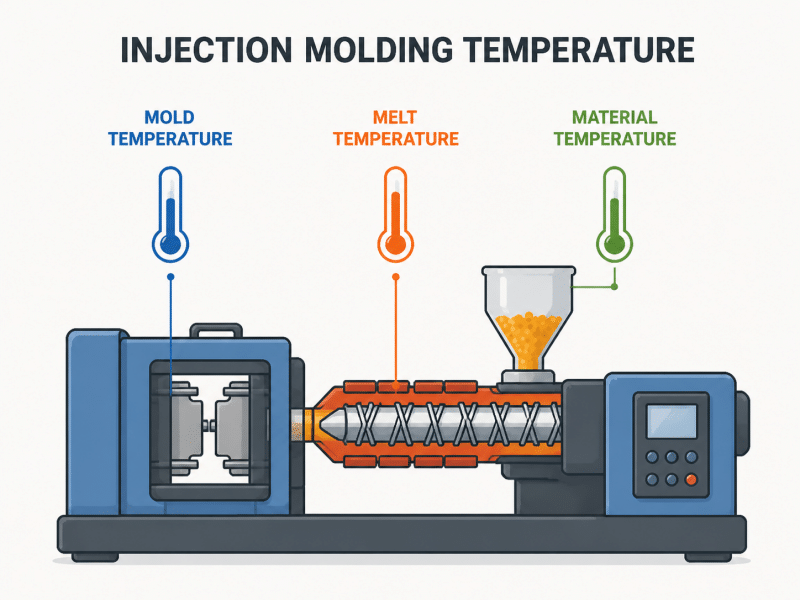
When it comes to injection molding, “temperature” might sound like a simple number on a machine dial, but in reality, it’s a complex system of interrelated parameters. The temperature of the molten plastic as it leaves the barrel, the temperature of the mold itself, and even the way heat is distributed across the mold all play a role in determining the final quality, dimensional accuracy, and surface finish of your parts.
In this guide, we’ll explore the key aspects of injection molding temperature, from basic definitions to practical controls, helping you make informed decisions that save time, reduce waste, and ensure your custom parts meet exacting standards.
If you are not familiar with injection molding process yet, you can learn more in our article on what is injection molding.
What Is Injection & Mold Temperature
In injection molding, temperature is not one single value—it’s a combination of melt temperature and mold temperature, each playing a distinct role in the process.
Melt Temperature refers to the heat of the plastic as it exits the injection barrel. Each material, from ABS to POM to polycarbonate, has an optimal melt range. If the plastic is too cold, it won’t flow properly and may leave the mold incompletely filled. If it’s too hot, the material can degrade, discolor, or create internal stresses.
Mold Temperature, on the other hand, is the temperature of the mold itself. This influences how the plastic cools and solidifies once inside the mold cavity. A mold that is too cold can cause shrinkage, internal stress, or dull surfaces, while a mold that is too hot may slow down production or even cause sticking problems.
These two temperatures are distinct but inseparable in practice: the melt must be hot enough to fill the mold completely, but the mold must be at the right temperature to control cooling, dimensional accuracy, and surface finish. Think of it like baking a cake: the batter needs to be prepared at the right heat, and the oven must be at the correct temperature to ensure it rises and sets properly.
Recommended Melt Temperatures for Common Plastics
Different plastics have different melting points, and setting the correct melt temperature is crucial to ensure proper flow, avoid degradation, and achieve high-quality parts. The table below summarizes typical melt temperature ranges for commonly used injection molding materials:
| Plastic Material | Melt Temperature (°C) | Melt Temperature (°F) |
|---|---|---|
| ABS (Acrylonitrile Butadiene Styrene) | 220 – 250 | 428 – 482 |
| POM (Polyoxymethylene / Acetal) | 175 – 205 | 347 – 401 |
| PC (Polycarbonate) | 280 – 300 | 536 – 572 |
| PP (Polypropylene) | 200 – 230 | 392 – 446 |
| PE (Polyethylene, HDPE/LDPE) | 180 – 230 | 356 – 446 |
| PMMA (Acrylic) | 240 – 260 | 464 – 500 |
| Nylon 6 / PA6 | 250 – 270 | 482 – 518 |
| Nylon 66 / PA66 | 260 – 280 | 500 – 536 |
Effects of Mold Temperature on Part Quality
Now that we understand the melt temperature required for different plastics, the next key factor is the mold temperature. Even with the correct melt temperature, an improperly heated or cooled mold can lead to dimensional errors, surface defects, or internal stresses. Let’s see how mold temperature affects part quality.
Dimensional Accuracy and Flow
Think of the mold as a warm pan. Pouring batter into a cold pan makes the edges set too fast, while a slightly warm pan allows the batter to spread evenly. Similarly, a well-heated mold lets molten plastic reach every corner, ensuring the part’s dimensions are closer to the design. Parts with thin walls or complex shapes benefit the most from this controlled flow.
Warping and Deformation
Plastic cools at different rates depending on mold temperature. If cooling isn’t uniform, internal stresses can build up—even if the part looks fine on the outside. Over time, these stresses might lead to twisting, bending, or minor dimensional drift. A mold heated evenly helps the plastic cool consistently throughout the part, reducing hidden tension.
Surface Appearance
A properly heated mold allows the plastic to relax and flow into the fine details of the cavity, producing smooth, glossy surfaces. A colder mold can cause the surface to look dull, uneven, or textured, even if the shape is roughly correct. This effect is tied to how the plastic meets the mold surface while cooling.
How to Choose the Right Mold Temperature
Choosing the correct mold temperature might sound complicated, but in practice, it’s mostly about matching the temperature to your material, part design, and quality goals. Think of it as adjusting your oven for different recipes: cookies bake differently from bread, and the same logic applies to injection molding.
Start With the Material
Different plastics have different thermal behaviors. For example, ABS or polypropylene solidify faster and can tolerate slightly cooler molds, while polycarbonate or PMMA need warmer molds to avoid surface blemishes or internal stress. Always check the material datasheet first—it usually provides a recommended mold temperature range.
Look at Part Geometry
Thin-walled parts cool very quickly, so a slightly warmer mold may be needed to prevent warping. Large flat surfaces, on the other hand, may shrink unevenly if the mold is too cold, causing dips or deformation. The mold temperature should balance cooling across the entire part.
Think About the End Use
If your part needs high dimensional accuracy or is visually critical (like transparent housings or polished surfaces), a slightly higher mold temperature is often preferred. For functional, hidden components where appearance is less critical, lower mold temperatures may be acceptable to speed up production.
Balance Speed and Quality
Faster cooling reduces cycle time, but it can increase the risk of defects. Slower cooling improves surface finish and reduces warping but may slightly increase cycle time. The goal is to balance quality and efficiency according to your project priorities.
Controlling Mold Temperature
Maintaining a consistent mold temperature across a complex cavity is not simple. Let’s see how manufacturers keep every section of the mold just right.
Temperature Control Systems
Most modern injection molds come equipped with built-in temperature control channels, where hot or cold fluids—usually water or oil—circulate to maintain a steady temperature. By adjusting the flow rate or temperature of these fluids, the mold can be heated or cooled as needed for each specific plastic material. Think of it like a car radiator: water flows through to remove or add heat, keeping the system stable.
Mold Flow Analysis
Before production, engineers often use mold flow simulation software to predict how plastic will fill the cavity and how it will cool. This allows adjustments to mold temperature, gate locations, or cooling channels to reduce potential defects. This proactive approach saves time, reduces waste, and ensures consistent part quality.
Temperature Control Units (TCUs)
Temperature control units are like thermostats for the mold. They pump fluid at a set temperature through the mold channels, ensuring the mold stays within the desired range. Modern TCUs can control temperatures very precisely, sometimes within a fraction of a degree, which is crucial for high-precision parts or clear plastics.
Manual Adjustments and Monitoring
Even with automation, skilled operators monitor mold temperature using thermocouples or infrared sensors. They can adjust the cooling/heating rate or flow if they notice temperature variations, ensuring that every part meets the design specifications.
Surface Coatings and Inserts
Sometimes, certain mold areas are fitted with thermal inserts or special coatings to control heat transfer locally. For instance, a polished insert in a thin wall area can keep that section warmer, allowing the plastic to fill the cavity fully without overcooling.
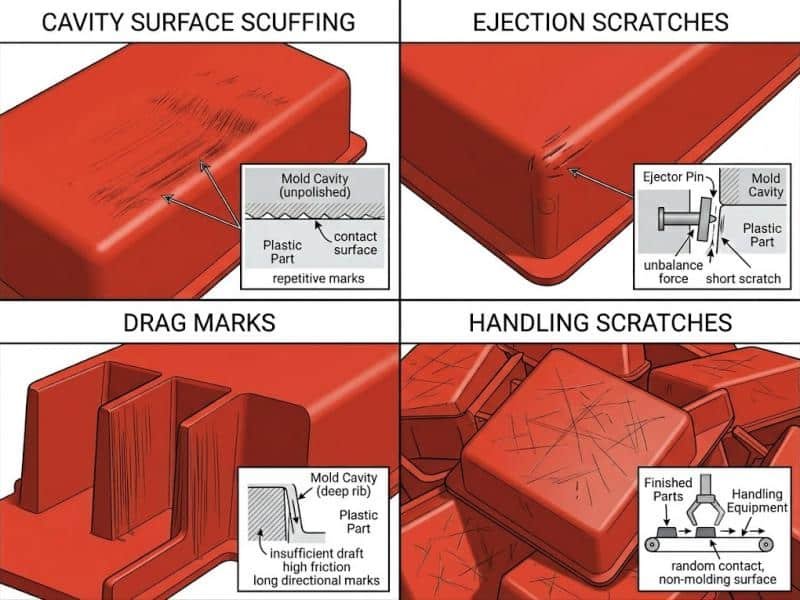
Common Defects Caused by Incorrect Mold Temperature
Even if you understand how mold temperature works in theory, practical mistakes can show up as visible or measurable problems in your parts. Here are the most common defects you might notice:
Warping and twisting: parts may bend, curl, or twist if different areas cooled too quickly or unevenly. For example, a flat bracket might not sit flush on a surface, or a thin lid might curl at the edges.
Sink marks: thicker sections of a part can develop small indentations or depressions on the surface if the mold is too cold. These are easy to spot visually and can affect aesthetics or assembly.
Surface roughness Issues: cold molds can produce rough, matte, or inconsistent surfaces, while overly hot molds may cause shiny spots or minor flow lines. This is especially noticeable on visible or clear plastic components.
Dimensional variations: parts may come out slightly too large or too small, causing fit issues for snaps, plugs, or mating components. Even small differences can prevent parts from assembling correctly.
Cracks or stress lines: improper cooling can sometimes leave small cracks or fine stress lines, especially near corners or sharp transitions. These defects can appear immediately or develop over time under load.
Conclusion
Mold temperature is more than just a number—it shapes how your parts flow, solidify, and finish, affecting dimensions, surface quality, and consistency. Even small adjustments can make a big difference, and understanding these effects helps you avoid costly defects and ensure reliable production.
To explore more about injection molding parameters, visit our guide on injection molding process parameters and how to optimize them.
For businesses looking for high-quality custom plastic parts, Zhongde provides professional guidance and support to help ensure your production runs smoothly from start to finish.